Monday, May 31, 2010

BBQ Sweet N Sour Meatball Kabobs

Here's a quick addition to this weekend's offerings.

What a time saver using frozen, pre-cooked meatballs.

I used Paula Deen's Almond Rice recipe and since corn on the cob is in season a shoe in! A quick, easy meal which was a life saver this weekend for me since I've been very busy with a new addition to my family.


2lb 8 oz of pure adorable. Sophie, my yoranian.


Now...back to the recipe! Hope you enjoy.


32 frozen fully cooked 1-inch meatballs (1 lb.), thawed
1 red pepper, cut into 1-inch squares
1 green pepper, cut into 1-inch squares
1/2 med onion, cut into 1-inch squares
1/4 cup apricot jam or grape
1/4 cup Barbecue Sauce


HEAT grill to medium-high heat. Thread meatballs and peppers and onion alternately onto 8 skewers. Soak wooden skewers for 30 minutes in water to prevent burning on the grill.

MICROWAVE jam in small microwaveable bowl on HIGH 15 sec. Stir in barbecue sauce; brush half onto kabobs.

GRILL 8 to 10 min. or until meatballs are heated through, turning occasionally and brushing with remaining jam mixture the last 2 min.

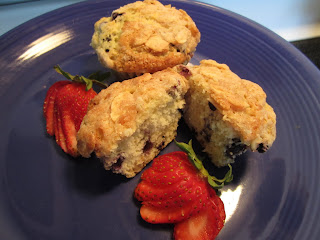
Almond Streusel Topped Blueberry Muffins

Concluding with my Memorial Day theme of Red, White and Blue recipes, here is "Blue". The sweet, crunchy streusel topping sets this muffin apart.

About.com tells us that blueberries, also known as bilberries, whortleberries and hurtleberries, are named for their velvety, deep-blue color, of course. These luscious berries are one of the few fruits native to North America.

Native Americans used the berries, leaves, and roots for medicinal purposes. The fruit was used as a fabric dye and combined with meat into a nutritious dried jerky.

The shrub is of the genus Vaccinium, from the Latin vacca for cow since cows love them, a fact first noted by Captain James Cook in the late 1700s.

Blueberries are often confused with huckleberries, which are of the Gaylussacia genus.

Blueberries used to be picked by hand until the invention of the blueberry rake by Abijah Tabbutt of Maine in 1822, so it's no wonder that Maine's state berry is the blueberry.

The most popular variety of blueberry is Vaccinium corymbosum, known as the "highbush" blueberry. The wild "lowbush" varieties are a favorite of those who like to pick their own in the wilds.


2 cups all-purpose flour
2 teaspoons baking powder
1/2 teaspoon salt
1 1/2 tablespoons all-purpose flour
1 1/2 cups fresh blueberries
1/2 cup butter
3/4 cup white sugar
2 eggs
1 teaspoon vanilla extract
1/4 teaspoon lemon zest
1/2 cup milk
2 tablespoons all-purpose flour
5 tablespoons white sugar
1/2 teaspoon ground cinnamon
2 tablespoons butter, diced
1/3 cup toasted, sliced almonds

1. Preheat oven to 375 degrees F (190 degrees C). Grease 12 muffin cups or line with paper muffin liners.
2. Combine 2 cups flour, 2 teaspoons baking powder, and 1/2 teaspoon salt in medium bowl. In a small bowl, sprinkle 1 to 2 tablespoons flour over blueberries, and set aside. (This simple trick will keep you from having "purple" batter)
3. In a large bowl, beat 1/2 cup butter with 3/4 cup sugar until light and fluffy. Beat in eggs, and stir in vanilla and lemon zest. Fold in dry ingredients alternately with milk. Fold in blueberries. Remember, fold gently, don't stir. Spoon batter into prepared cups.
4. Combine 2 tablespoons flour, 5 tablespoons sugar ,and 1/2 teaspoon cinnamon in a small bowl. Cut in 2 tablespoons butter with fork or pastry blender until mixture resembles course crumbs, add 1/3 cup toasted sliced almonds and gently blend, being careful not to break nuts too much. Sprinkle over batter in muffin cups.
5. Bake in the preheated oven for 20 to 25 minutes, or until a toothpick inserted in center of a muffin comes out clean. Cool in pans on wire rack. These muffins freeze really well, and re-heat in the microwave successfully.

Strawberry Shortcake Puddin Squares

This is a fast, no bake dessert. The cookie, pudding mixture resembles the taste of broken ice cream cones and the center creme of oreo cookies with a cool layer of vanilla inbetween. The sweet tang of the strawberries is a perfect addition.

Can be made the day before. Make sure it is chilled the full three hours for ease in cutting squares.


1 Package Vanilla Creme Sugar Wafers, crushed
5 Tbsp. margarine or butter, melted
2 pkg. (3.4 oz. each) JELL-O Vanilla Flavor Instant Pudding
2-1/2 cups cold milk
1-1/2 cups thawed COOL WHIP Whipped Topping
3 cups sliced fresh strawberries
2 tablespoons sugar


CRUSH sugar wafers; mix with margarine. Reserve 1/2 for middle layer. Press onto bottom of 13x9-inch pan.

BEAT pudding mixes and milk in large bowl with whisk 2 min. Stir in COOL WHIP; spread half over crust. Cover with layer of remaining wafers and pudding mixture. Refrigerate 3 hours. Meanwhile, toss strawberries with 2 tablespoons sugar. Refrigerate until ready to use.

CUT dessert into squares to serve; top with berry mixture. Garnish with whipped cream.

White Chocolate Macadamia Nut Cookies

This recipe came about for a couple reasons. I was given a large amount of Macadamia Nuts. Memorial Day was approaching and the next series of recipes are themed in Red, White and Blue. This one of course, being White.

I think it is beneficial at times to revisit the reason behind a holiday. I know my memory was refreshed while researching, I'll share the findings below.

Quoting Wikipedia it states, Memorial Day is a United States federal holiday observed on the last Monday of May Formerly known as Decoration Day, it commemorates U.S. soldiers who died while in the military service.[1] First enacted to honor Union soldiers of the American Civil War (it is celebrated near the day of reunification after the Civil War), it was expanded after World War I to honor dead Americans from all wars.

By 1865 the practice of decorating soldiers' graves had become widespread in the North. General John Logan, National Commander of the Grand Army of the Republic--the society of Union Army veterans--called for all GAR posts to celebrate a "Decoration Day" on May 30, 1868. There were events in 183 cemeteries in 27 states in 1868, and 336 in 1869. The northern states quickly adopted the holiday; Michigan made "Decoration Day" an official state holiday in 1871 and by 1890 every northern state followed suit.

Again turning to Wikipedia for information I found this information on the Macadamia nut.

Macadamia is a genus of nine species of flowering plants in the family Proteaceae

They are small to large evergreen trees growing to 2–12 m tall. The leaves are arranged in whorls of three to six, lanceolate to obovate or elliptical in shape, with an entire or spiny-serrated margin. The flowers are produced in a long slender simple raceme the individual flowers in white to pink or purple, with four tepals. The fruit is a very hard woody globose follicle with a pointed apex, containing one or two seeds.

The genus is named after John Macadam, a colleague of botanist Ferdinand von Mueller, who first described the genus.[1] Common names include Macadamia, Macadamia nut, Queensland nut, Bush nut, Maroochi nut, Queen of Nuts and bauple nut; Indigenous Australian names include gyndl, jindilli, and boombera.

Outside of Hawaii and Australia, macadamia is also commercially produced in South Africa, Brazil, California, Costa Rica, Israel, Kenya, Bolivia, New Zealand, Colombia and Malawi. Australia is now the world's largest commercial producer

Here's the recipe:


1 cup butter, softened
3/4 cup packed light brown sugar
1/2 cup white sugar
2 eggs
1 teaspoon vanilla extract

2 1/2 cups all-purpose flour
1 teaspoon baking soda
1/2 teaspoon salt
1 cup coarsely chopped macadamia nuts
1 cup white chocolate chips

1. Preheat oven to 350 degrees F (175 degrees C).
2. In a large bowl, cream together the butter, brown sugar, and white sugar until smooth. Beat in the eggs, one at a time, then stir in the vanilla and almond extracts. Combine the flour, baking soda, and salt; gradually stir into the creamed mixture. Mix in the macadamia nuts and white chocolate. Drop dough by teaspoonfuls onto ungreased cookie sheets.
3. Bake for 10 minutes in the preheated oven, or until golden brown.

Saturday, May 22, 2010

Beef Enchiladas

!Hola Dancing the Macarena into the kitchen today!

Inspiration for this recipe selection came from researching chocolate which goes back to Aztec times.

Mexico.

My first experience with Mexican food came when my family accompanied my father on a Convention trip to Memphis, Tennessee.

I was around nine years old, the year 1963. 78 years after the first reference to enchiladas in the United States. How does Mexican cuisine and Tennessee relate, you ask? I haven't a clue except that was my first introduction to an authentic Mexican family and their cuisine, whose restaurant my family happened upon and selected for dinner that evening.

I'll never forget my first taste of homemade salsa and freshly made tortillia chips. The rest of the meal which included enchiladas was just as memorable.

It was a great trip with memories that included an up close and personal view of Graceland, Elvis Presley's home.

Back to Mexican cuisine and enchiladas...

According to The World of Food And Wine

Salsa was sold in the Aztec market places. Salsa, the Spanish word for sauce, is uncooked and sometimes pureed until chunky, smooth, or chopped. Large red tomatoes, tomatillo, chipotle {a staple in the Aztec diet} and the avocado are found in the modern salsa, and are the same core ingredients used in the past. We can thank the Aztecs for Chocolate. It was through them that the Spaniards brought the product to Europe in 1657.

The term enchilada is first referenced in the US in 1885. Yet the concept of tortillas being used as a wrap can be clearly linked to the Aztecs. The word enchilada means "in chile."

The tomatillo is a fruit that dates back to at least 800 BC, the word meaning round and plump. The Aztecs domesticated it, and when the Europeans came to Mexico, they documented the local foods and often confused the names by shortening the words. Though never popular with Europeans, it thrived in Italy. Today a relative of the fruit is common in the US. Tomatillo, a member of the night shade family, provides tart flavor in many different green sauces.

The Portuguese aided the spread of the chili pepper plants. Thought the earliest mention was in 1542 when a German herbalist, Leonhart Fuchs, described and illustrated several types of peppers. Though for people of Europe, the history of the pepper began in the late 15th century, when Colombus brought the peppers home. There is archaeological evidence that peppers were in use since 5000 BC.

Pre-Columbus is how far back the Tamale can be traced. The Friar Bernardino de Sahagun documented that the Spaniards were served tamales by the Aztecs in the 1550's.

Other foods that we associate with Mexican cuisine, are not traditionally so. The Flan was discovered in Medieval Europe. And ceviche is an Inca discovery, eating their catch of the day raw with only a few seasonings. It wasn't until the late 15th century when Native American chefs of Ecuador and Peru began to add the citrus fruits with the South American fish, and creating the dish that we know today.

Flavors from around the world have influenced Mexican dishes. The same can be said about Mexican traditional favorites affecting other countries menus. In just about every culture you look at, you can find a hint of Mexico.

My suggestion for a lovely Mexican menu would be homemade salsa and chips, a bubbling tray of enchiladas, spanish rice and refried beans. Complete the meal with a lovely, Carmel Flan.


Enchiladas

1 lb ground beef

2 cloves garlic, crushed and minced

½ cup chopped onion

1 cup shredded Monterey Jack cheese

8 -10 small corn tortillas

½ teaspoon salt

¼ teaspoon black pepper

2 cans enchilada sauce, 10 oz each

¼ cup Pace cheese queso dip

Fresh parsley to garnish

Sour cream

Sliced Black Olives


Preparation:

Preheat the oven to 350 degrees F.

Brown the ground beef, onion and garlic in a non-stick skillet for 8 to 10 minutes or until the beef is brown. Pour off any grease. Season with salt and pepper. Stir in ½ cup of enchilada sauce and set aside the rest from that can, stir in cheese queso dip.

Pour the whole of the other can of sauce into a shallow baking dish.

Heat enough oil in a pan to cover bottom. Dip one corn tortilla in oil, one side then the other, just to soften (not fry). Complete the process with all the tortillas. Lay on paper towel while cooking the others.

Spoon the beef down the middle of each tortilla and roll it up. Put the enchiladas seam side down in a 13 x 9 inch baking dish. Spraying pan with Pam first helps with clean up.

Cover the dish and bake for 15 minutes. Uncover the dish, spoon the rest of the enchilada sauce from the first can over the enchiladas and sprinkle with the cheese.

Bake uncovered for another 10 minutes or until the cheese melts.

Garnish with parsley and serve with sour cream and sliced black olives.

(Serves 4)


Jazzed Up Fudge No Bake Cookies


Chocolate....who doesn't love it?! I know, I know...woman have been linked to the love of chocolate. So much so, we have been accused of giving up 'other' pursuits of happiness for it.

Uh....okay...its possible. To spend a life void of chocolate could cause one to think its a life not worth living.

Sound dramatic? Quite simply. Yes. Why? Because it is. It creates drama. It creates joy. And, thank God, recently the media reports that eating dark chocolate has healthy benefits. Oh, how I have waited for that stamp of approval. Bring on the chocolate!!

Wikipedia states While chocolate is regularly eaten for pleasure, there are potential beneficial health effects of eating chocolate. Cocoa or dark chocolate benefits the circulatory system.[50] Other beneficial effects suggested include anticancer, brain stimulator, cough preventor and antidiarrhoeal effects.[51] An aphrodisiac effect is yet unproven.

It also tells us Theobroma cacao, native to Mexico, Central and South America, has been cultivated for at least three millennia in that region. Cocoa mass was used originally in Mesoamerica both as a beverage and as an ingredient in foods. Africa also produces large quantities. In 1689, noted physician and collector Hans Sloane developed a milk chocolate drink in Jamaica which was initially used by apothecaries, but later sold to the Cadbury brothers in 1897.[21]

Chocolate in its solid form was invented in 1847. Joseph Fry & Son discovered a way to mix some of the cocoa butter back into the dutched chocolate, and added sugar, creating a paste that could be molded. The result was the first modern chocolate bar.


Dutch chocolate brings us to today's recipe. No bake cookie recipes have been around forever. I make this my own by using Special Dark Dutch Processed Cocoa and making white chocolate ganache for a drizzle. My opinion the Special Dark Dutch Cocoa provides a very deep, rich chocolate flavor and the small amount of white chocolate ganache drizzle compliments. I had a little White Chocolate Ganache leftover, so as the picture shows, I drizzled a few potato chips. The salty crunch mixed with sweet is heaven!


Jazzed Up Fudge No Bake Cookies


2 cups sugar

1/4 cup Special Dark Dutch Processed Cocoa

1/4 cup butter

1/2 cup milk

1/2 cup crunchy peanut butter

3 cups quick oatmeal

1/2 teaspoon vanilla

pinch of salt


Combine sugar, cocoa and butter, milk and salt. Boil 1 minute (this is critical). Remove from heat, add peanut butter and vanilla. Stir until dissolved. Add oatmeal and mix. Drop from tablespoon on wax paper. Drizzle with white chocolate ganache. Allow cookies to sit and 'set up'. Makes approximately 36 cookies.


White Chocolate ganache

1/4 cup white chocolate chips

2 tablespoons heavy cream


In a zip lock bag combine white chocolate chips and heavy cream. Microwave for 15-20 seconds. Take out and massage mixture to combine. Looking for a smooth consistency and thin enough to 'drizzle' a stream. If needed add a bit more heavy cream and microwave for 10 seconds, massage until mixed well. Be careful not to overcook or chocolate could seize on you.

Snip a very small tip off bottom of one corner of zip lock bag and drizzle across cookies.


Friday, May 21, 2010

Salmon Patties


Ever come home tired from work? How about forgetting to unthaw meat for dinner? Unmotivated to whip out a huge three course meal? I felt that way the other day driving home from work. I didn't want anything too 'heavy', but a sandwich wasn't on the list, as well.

The light bulb came on and relieved and relaxed I made my way home. Salmon patties were on the menu for dinner.

Pantry necessities to me will always include several cans of salmon. They are very budget friendly and convenient.

Pink Salmon has a light color and mild flavor, while Red (or Sockeye) Salmon has a richer more intense flavor and color - either variety works beautifully in recipes. Traditional pack canned salmon contains skin and delicate, edible bones that are rich in calcium and magnesium. I always remove the skin by gently scraping it away and if you open the salmon carefully, you can easily remove the bones as well, since this is unappealing to me. Canned Salmon also comes skinless and boneless.

Fish curing is one of the oldest industries in North American. Fish was prepared for marketing by salting. Then the early years of the nineteenth century, the first canned seafood products appeared in the United States. Rapid expansion took place in the middle eighteen hundreds with Pacific Salmon. Canneries sprouted in California, Washington, Canada and Alaska. Canned seafood never looked back, but kept expanding with new varieties including sardines, tuna and mackerel, just to name a few.

I, for one am most grateful for these convenient products.


SALMON PATTIES:


1 can of Pink Salmon, drained (skin and bones removed)
2 eggs, beaten lightly
1/4 cup of finely chopped onion
1/4 cup of finely chopped celery
1/4 cup plain dry bread crumbs
3 tablespoons of Mayonnaise or Miracle Whip (your choice)
1/2 teaspoon of dill weed (optional)
Dash of garlic salt

Oil and butter for the pan.


After salmon is drained, skin and bones removed, place in a medium bowl. Beat the eggs lightly, add to the salmon along with the celery, onion and mayonnaise. Very gently fold to mix. You do not want to break up the salmon too fine. Combine dry bread crumbs, dill weed and garlic salt and add to salmon mixture, again being very gentle mixing.

Melt 2-3 tablespoons of oil and 2 tablespoons of butter on medium high heat. I like the taste of the butter, adding the oil keeps the butter from burning so easily.

When pan is hot and oil/butter melted, take an ice cream scoop of salmon mixture and drop in pan, then very gently pat ball down with your fingers to flatten slightly. Continue making patties until pan is full but there is space between each patty for turning. You should end up with 4-6 patties depending on how large you make them. Check underside of patty by lifting with a spatula for desired brownness. Deep golden brown is my preference. If patty acts like it will break apart, leave alone for a little while longer to 'set up'. Cook each side for 2-4 minutes again depending on how light or dark you prefer yours.

Serves 4

Serving suggestions: Place two patties on dinner plate, buttered parsley noodles and fresh peas would be a nice choice. My pictures shows alfredo noodles with a few peas for color and corn on the cob. Or make into a sandwich with lettuce, tomato on a bun.


I enjoy making homemade remoulade sauce to accompany. Here's a quick and easy recipe:

1/2 cup mayonnaise
1 tablespoon finely chopped onion
2 tablespoon sweet pickle relish
1 teaspoon lemon juice
1 tablespoon thousand island dressing
few dashes of worcestershire sauce
dash of garlic powder

Combine and refrigerate for an hour to combine the flavors. This is great with salmon, crab cakes or any fried fish. Makes 3/4 cup.


Tuesday, May 18, 2010

Shrimp, Bacon and Tomato with Cheesy Grits


I awoke one morning feeling the call of the French Quarters in New Orleans. Beignets drenched in powdered sugar at Cafe Du Monde and creamy, cheesy grits with shrimp at a number of outstanding establishments.

Logistics not permitting my leisure culinary exploration, I settled for the adventure of creating grits and shrimp in my own kitchen to quiet my urgent yearning.

I researched several recipes and then added my own to the mix. I'll share that recipe here.

What are grits, you ask? Grits are finely cracked corn and meal ground into a coarse flour.
They have been around practically as long as maize (corn) has been cultivated, nearly 7000 years! The first meal the white man shared with the Indians at Jamestown, Virginia in 1607 included white grits as noted by several of the diaries of people who attended.

Too long since you curled up with a creamy bowl of grits and shrimp? Why not try this one...


Shrimp, Bacon and Tomato On Cheesy Grits


  • 3 cups Chicken Broth
  • ¾ cups Quick Grits
  • 1 cup Sharp Cheddar Cheese, Shredded
  • 3 Tablespoons Butter
  • 1 pinch Salt
  • ½ teaspoons Pepper
  • 2 Tablespoons Olive Oil
  • ¾ pounds Bacon, Cut In 1/4 " Matchstick Pieces
  • 4 cloves Garlic, Minced
  • 1 pound Shelled, Deveined Large Shrimp
  • 3 stalks Green Onion, Sliced In Small Slivers
  • 1 whole Roma Tomato,cut In Half, Halves Cut In Thirds, Sliced In Small Pieces
  • 2 Tablespoons Chopped Flat Leaf Parsley

1. In a medium saucepan, bring the stock to a boil. Whisk in the grits and cook over moderately high heat, stirring constantly, until thickened and the grains are tender, about 5 minutes. Add the cheese and butter, season with salt and pepper and whisk just until the cheese is melted. Cover and remove from the heat.

2. In a large, deep skillet, heat the olive oil until shimmering. Add the bacon and cook over moderately high heat, stirring occasionally, until the fat is rendered and the bacon is golden, about 8 minutes. Using a slotted spoon, transfer the bacon to a paper towel-lined plate to drain.

3. Pour off all but 4 tablespoons of the fat in the skillet. Add the garlic and cook over moderately high heat just until fragrant. Add the shrimp and cook until curled and pink, about 3 minutes. Stir in the parsley and bacon; season with salt and pepper. Add green onions and tomatoes just to incorporate and barely warm up.

4. Spoon the warm, cheesy grits into shallow bowls and top with the shrimp and bacon. Serve right away.

Serves 4. Preparation time: 10 minutes. Cooking time: 20 minutes. Memories: Lasting